Is the Koala Sampler the ultimate pocket-sized sampler for smartphones? Let’s have a deep dive into the application and see how it performs!
If you are interested in Koala Sampler Skins, check this post of mine. Also, this one is for Xmas skins and for Sakura skins. And in general, follow my Koala Sampler tag for the latest updates.
What is a Koala Sampler?
First things first, let us define what a Koala Sampler is before we go further with this article. In short, Koala Sampler is a smartphone application available for iOS and Android that lets you produce beats instantly. It is simple and perfect for starters and experienced users, from my point of view. In the end, you can easily produce songs like this:
Read more about the Demon Festival EP here.
According to their website, it offers:
- Record up to 64 different samples with your mic
- Transform your voice or any other sound with 8 superb built-in FX
- Adjust the trim, pan, pitch, and volume of your samples
- Export your projects as Ableton Live Sets (iOS only)
- Export loops or entire tracks as professional-quality WAV files
- Copy/paste or merge sequences just by dragging them
- Import your own audio files; many formats are supported
- Create beats with the high-resolution sequencer
- Keyboard mode lets you play chromatically or on one of 9 scales
- Quantise, and add swing to get the right feel
- Add any (or all) of the 16 effects to the entire mix
- AudioBus 3.0 compatible (iOS only)
- MIDI controllable
- Jam with others over WiFi with Ableton Link (coming soon to Android)
I will not feature all of them as I am using them on an Android phone currently, but trying to highlight some of the features.
How to use a Koala Sampler?
Let me share with you a couple of videos. I will be editing a royalty-free sample and some basic drums. No additional audio/music is going to be added, so you can focus on the application more easily.
Quick Overview
Don’t be surprised, it is a silent video as I have yet to add any audio files. Also, praise my little homemade skin. This is one of the funky features of the app; you can add skins and glitches if you wish. It makes the Koala Sampler quite comfy for me. I added a latte and a hedgehog (as a hedgy owner).
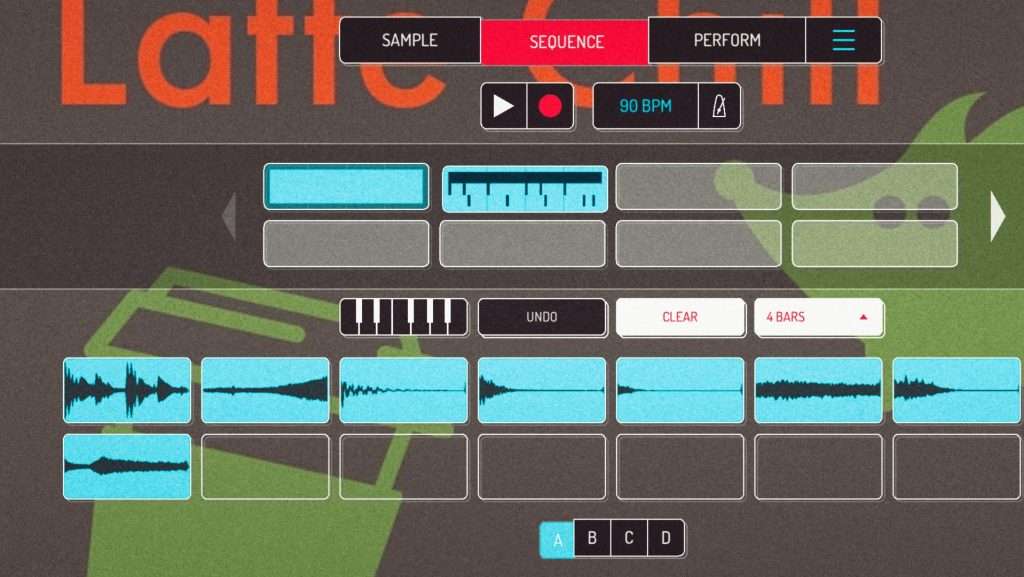
The application has 3 main areas: Sample, Sequence, and Perform.
Understanding the Sample tab
You can add the samples here. You may choose to record by holding and tapping any of the 16 buttons on the screen. Or alternatively, select one from your existing files through the hamburger menu, selecting ‘Import Audio’.
Don’t worry if you are puzzled now about where to find samples. Check my article on this topic and mind copyright.
Once you have the set of samples you wish to work on, check ‘Edit’ to cut the sample and use the important parts only. Check if the tones are right, listen to them with your ears, or use professional samples as they mark the scales in the filenames.
Watch out for drums as well, worth adding a cleaner set or recording your own. It takes more time, but auto-chop (Samurai mod only) will help you.
Working on a new beat? The sequence will help you!
This is where, from my point of view, things might get a bit more complicated if you are not used to this kind of workflow. Fear not, I try to help you understand Koala Sampler better and push you forward to record your first song.
Click on tempo to edit it. Worth aligning it to the sample you chose in case you use royalty-free ones. If you have no clue, use the tap function; otherwise, simply set it. Mind swing gives a bit of a humanised feeling to your beats by adding some off-beats to the song.
Use the piano roll (Samurai mod only) to start the sample perfectly and start adding your beats. If you are hesitant to use Samurai at first (as it has extra costs), you can create songs without it. My EP, Demon Festival, was fully produced without Samurai. So I can understand you.
Pro tip: While the app makes it easy to tap out beats, understanding the layout of a physical piano helps tremendously when using the internal sampler to write melodies. If you happen to have one around, spend some time upskilling yourself a bit, and your samples will be thriving even more. It applies to other instruments either naturally.
As you will see in the video, hitting the ‘x’ is impossible in landscape mode currently; hopefully, they will mend it soon.
Ready to Perform?
Once you are set with the patterns, head over to Perform and enjoy the different filters to make your beats dope. Explore them before recording, and try to find the best mix for your song.
As a lofi beatmaker, I was aiming to replicate a vinyl vibe. Let me show you a great video on this topic.
Simply hold the Compressor, Filter, and Vibroflange. Give it a try, you will love what you hear.
Recording your song
It is personal, where to record your song, but I usually set my effects in Perform and control the song in Sequence. So I record my song there. I change to the Perform tab if I change the effects in the middle of the song. Let me show you 2 live songs, both screen-recorded with my phone.
Koala Sampler vs PO-33 KO?
A question I often read about: is it PO-33 KO or Koala Sampler worth investing in? To be honest, it is difficult to give a short answer as they are offering similar ones. Yet, two completely different instruments.
Pocket Operator 33 KO is a budget pocket sampler with physical buttons. Therefore, it is like an instrument you can use to play melodies and record easy beats on the go.
For me, Koala Sampler is more complex, offering a bit better handling of samplers as well as more effects, so I can work on lofi beats more efficiently. On the other hand, much slower. If my PO-33 KO is set up properly, I am taking it out and into the melodies already. However, I must add that I composed several albums with PO-33. Therefore, I know the button shortcuts by heart. For someone new to both, PO-33 takes more time to master the basic workflow.
What Koala Sampler misses by nature is the physical buttons. You can, of course, purchase Bluetooth midi keyboards or pads. You can even connect them with converters via cable. Again, Koala Sampler offers more in that sense, but you will need to bring them around the clock to have the same package.
After having both for a year now, I personally love sketching basic beats on my PO-33 KO, and the keyboard module is currently smoother. I play all the melodies with it, and I love using the Koala Sampler as the sampler hooked up to the PO-33.
Koala Sampler synced with Pocket Operator
Not the best video, I guess, but does the job. As initially explained, this is probably the best setup to produce beats with pocket tools. You have to enable Pocket Operator sync as shown in the first video.
Pro tip: if you want to make it sync 100%, you will need to boost the volume to the max. You can lower the volume in the Sample/Editor of the samples one by one to make them fit your beat.
Another tip would be to mind what samples will be played on both instruments. Personally, I love running chords and base melody samples on the Koala Sampler if it is hooked with PO-33 KO. While I play bass and solo melodies on PO-33.
As for drums, it changes by song, but I prefer using the PO-33. So when I play the scratch effect, the melody (from Koala Sampler) remains unchanged and gives a body to the song. While the drums are being messed up with effects on PO-33.
In-app purchases and Samurai mode
I tried to mention during the feature overview that there are features only available with Samurai mode. I’m not saying it is mandatory, but it is worth considering once you are comfortable with the app. Read more about it here.
Koala Sampler VS SP404
Last but not least – is it worth replacing your SP404 with a 4 USD app? I leave it up to you. Personally, I loved the video, but yes, well. Koala Sampler is a great app from my point of view. Perfect for sketching, but I cannot see myself performing a full set with it…#jk